Anvils
Anvils are an important tool required for metalworking, as they allow you to work and weld metal ingots into various different forms.
Anvils can be useful for both Working, which is used to form one piece of metal into another, or Welding, which is used to fuse two metal items into one solid piece.
Multiblock
All types of metal anvils.


Anvils can be crafted with Double Ingots of their respective metal. For your first anvil, you must weld double ingots first on a Stone Anvil.
Anvils each have a Tier, which defines what types of material they can work and weld. An anvil can work metals of its current tier, and it can weld metals that are one tier higher.
- Tier 0: Stone Anvils
- Tier I: Copper
- Tier II: Bismuth Bronze, Black Bronze, Bronze
- Tier III: Wrought Iron
- Tier IV: Steel
- Tier V: Black Steel
- Tier VI: Red Steel, Blue Steel
Working
In order to work an item on the anvil, you will need to use the anvil, to open up the anvil interface, seen to the right. On the left, there are two input slots for items - for working, the target item must be in the right hand slot. You will also need a hammer while working, either in the hammer slot on the right of the anvil or in your main hand. The hammer will gradually take damage as you work the item.
The anvil interface.
You will then need to select the Plan, which chooses which item you want to create. Left Click on the the scroll button, and then pick one of the items to create. The anvil interface will return, but now you will have selected a plan - the scroll will show the item you are working to create, and the Rules and Target will now be populated.
After selecting to create a pickaxe.
Targets
In the middle of the anvil screen, there is a bar with two colored indicators. The green pointer, is your current working progress. The red pointer, is the target. Your goal is to line up the current progress, with the target.
In order to do this, you can use the green and red action buttons, which move your current progress a certain amount, depending on the action taken.
Green actions will always move your target right, and Red actions will always move your progress left. Note that if you move your target off of the progress bar, you will have overworked your item - you will lose the ingot. However, while working, you must also match the rules...
Working Rules
The rules, are the two or three icons shown on the top of the anvil interface. They represent specific actions that must be taken, at specific times, in order for your working to be a success. For example, a rule could be Bend Second Last, meaning the second to last action you take must be a Bend action.
Your last three actions are shown right underneath the rules. When a rule is satisfied, its outline will change to green. Success occurs when all rules are satisfied.
Finally, you have to be mindful of your item's temperature. Metals can only be worked when they are above a certain temperature where the tooltip shows "Can Work". You may take an item out and re-heat it during the working process.
Forging Bonuses
Working can be tedious, and take many steps to get correct. However, there is a reward for being efficient. Some items, such as tool heads, when they are worked in a low or minimal amount of steps, receive a Forging Bonus based on how efficiently they were forged. This bonus will then apply to tools that the item is used in, for example, a pickaxe head used to make a pickaxe.
Perfectly Forged
Item: tfc:metal/pickaxe/wrought_iron[tfc:forging_bonus={type:"perfect"}]
There are four tiers of forging bonus:
- Poorly Forged
- Well Forged
- Expertly Forged
- Perfectly Forged
These bonuses increase the power of your tool - making it break less often, mine faster, and/or do more damage in combat, depending on the tool.
Welding
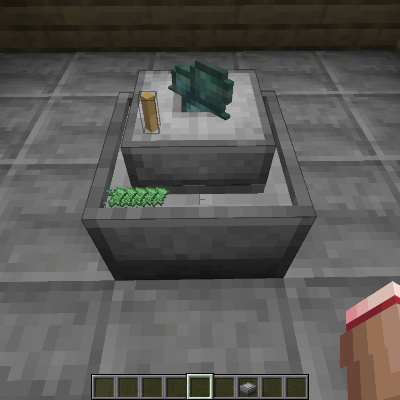
Welding is a process through which two items are fused together to create a new item. Welding works the same whether on a Stone Anvil or a metal anvil.
First, you must place the two items you want to weld on the anvil. You can do this either by using the items on the anvil, or by opening the anvil interface and inserting them in the two leftmost slots.
You also need to have at least one Flux in the anvil to aid the welding process. Then, while both items are hot enough to weld - the tooltip will say "Can Weld" - you must use any Hammer on the anvil. You will hear a hammering sound and the items will be welded together. They can then be extracted by using Right Click on the anvil with an empty hand.